3. Setting Up
Turntables are precise instruments and require calibration in order to work correctly, otherwise damage to the needle and cartridge and to the vinyl itself can occur. All but one of the adjustments happens at the tone arm:
- Tone arm height the vertical height of the tone arm from the turntables main body - normally adjusted by twisting the base of the tone arm.
- Counter balance weight the amount of weight that is on the opposite end of the tone arm from the cartridge. Normally the amount of weight is not altered, rather its distance from the fulcrum point, which has the same effect.
- Arm tension or anti-skate without any tension pulling the arm outwards, a tone arm would naturally want to travel in towards the centre of the record. In some situations this would cause the needle to skate across the surface of the record, which could scratch it badly. Most turntables have a small dial which adjusts the amount of tension on the arm.
- Feet height if the turntable is not level then this can cause the arm to skip. You can normally adjust the height of each of the feet to even up the deck.
-
- Before setting up your turntable for the first time, refer to the specific instructions that came with it, and also with your cartridge, as each different model may have specific settings. Heres a general purpose guide:
- Firstly, set the decks down in the place you wish to use them and make sure they are on a sturdy, horizontal surface. If is not horizontal, use the adjustable feet to even up each turntable - a spirit level can help with this.
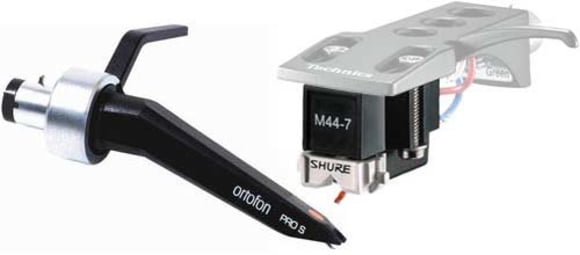
- Attach the cartridge to the head shell as described in the cartridges manual - it is important to ensure that the small cables are attached to the correct pins on the head shell. If you are using a Concorde style cartridge you do not have to worry about this as they clip straight in.
Concorde Cartridge and a OM Cartridge for screwing on a head shell
- Slip the ring weight onto the rear tone arm shaft, and make sure it is as far in as possible.
- Attach the head shell to the front of the tone arm using the locking nut.
- While supporting the front of the tone arm, unclip it from the tone arm rest and move it away from its stand. Now unscrew the ring weight from the tone arm until the arm balances horizontally by itself.
- At this point the inner ring of the balance weight should be set so that the dial reads zero, and then the weight should be turned so that the correct amount of pressure is put on the needle. The manufacturer of the cartridge will provide this value, so check the documentation provided.
- Finally, set the anti-skate to the same value as the tone arm weight, and refer to the turntables documentation for the setting of the tone arm height, which is related to the height of the cartridge.
After the tone arm has been calibrated, all that is left to do is make the connections to your chosen mixer. Turntables have three connections - left audio, right audio, and ground. The left and right audio ouputs should be connected to their respective phono inputs on the mixer, and the ground wire should be connected to the common ground found on the rear of all mixers designed for use with record players. If the ground is not connected then there may be an audible hum when you turn on your amplifier or PA system.


